Sunday 21 September 2014

A Fairy Corner

For the last year we have had an old dolls house in a quiet corner of our garden. We used to put furniture and fairies out daily but lack of interest meant that we quietly stopped setting it up every day so it got even less attention and sat, sad and neglected.

It was on my list for the summer hols and amazingly I actually got round to having a think about how to draw the children in and get the dolls house working for us.


Standing back and looking at it objectively I could see several problems with it as it stood. Firstly it was in a dark, drab little corner and I think most of the children just didn't see it. Secondly the ground was rough and quite spiky, certainly too uncomfortable to sit on to play. Thirdly it wasn't well enough kitted out to spark any initial inspiration to play.

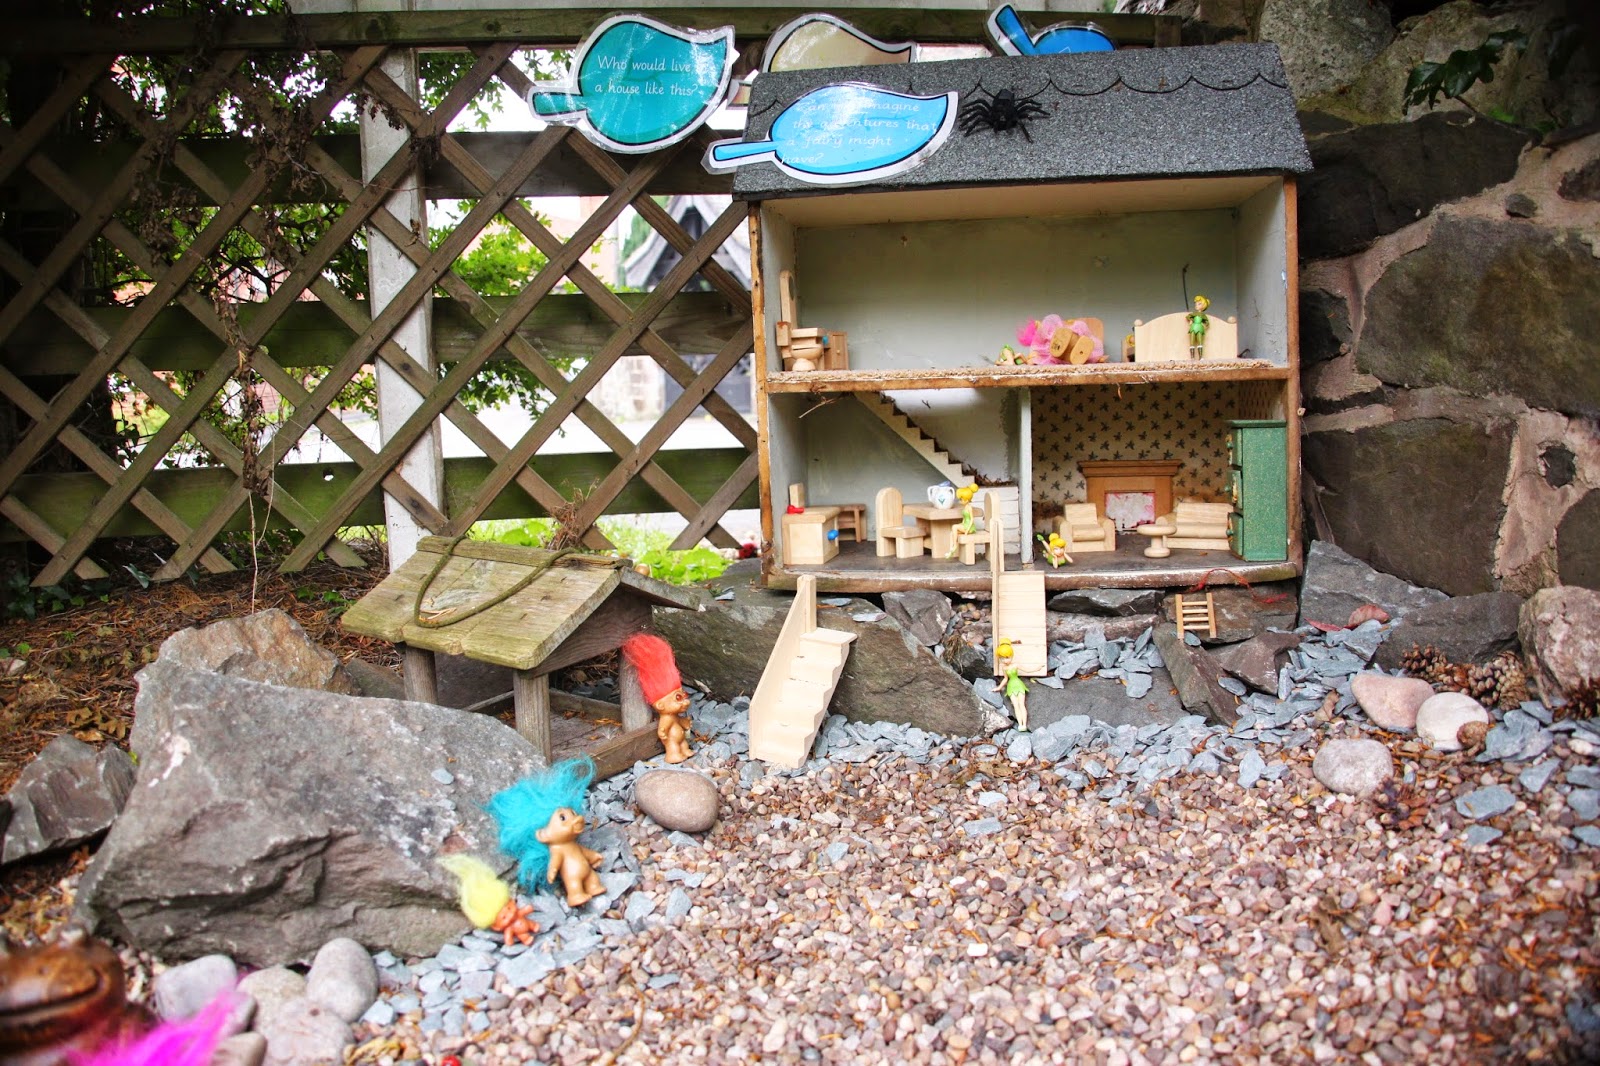
My first job was to cut back some of the overhanging branches and open the area out, creating a more welcoming area. Secondly I raised the dolls house onto a platform of rocks making it more accessible. Thirdly, I outlined an area around with rocks and filled this area with gravel from elsewhere in the garden. This immediately brightened the corner up and looked much more inviting.  I added some slate and cobbles for a bit of variety.

Then for the fun bit, I added lots of bits and bobs for open ended play. Most of these bits I picked up at car boots but some, like the fairies and trolls I bought off Ebay.

a little tea set on a flat rock for frog to give tea parties


An old bird feeder from my mum makes a perfect summer house for our fairies... watch out for that big spider!


An inviting area to play fairies.


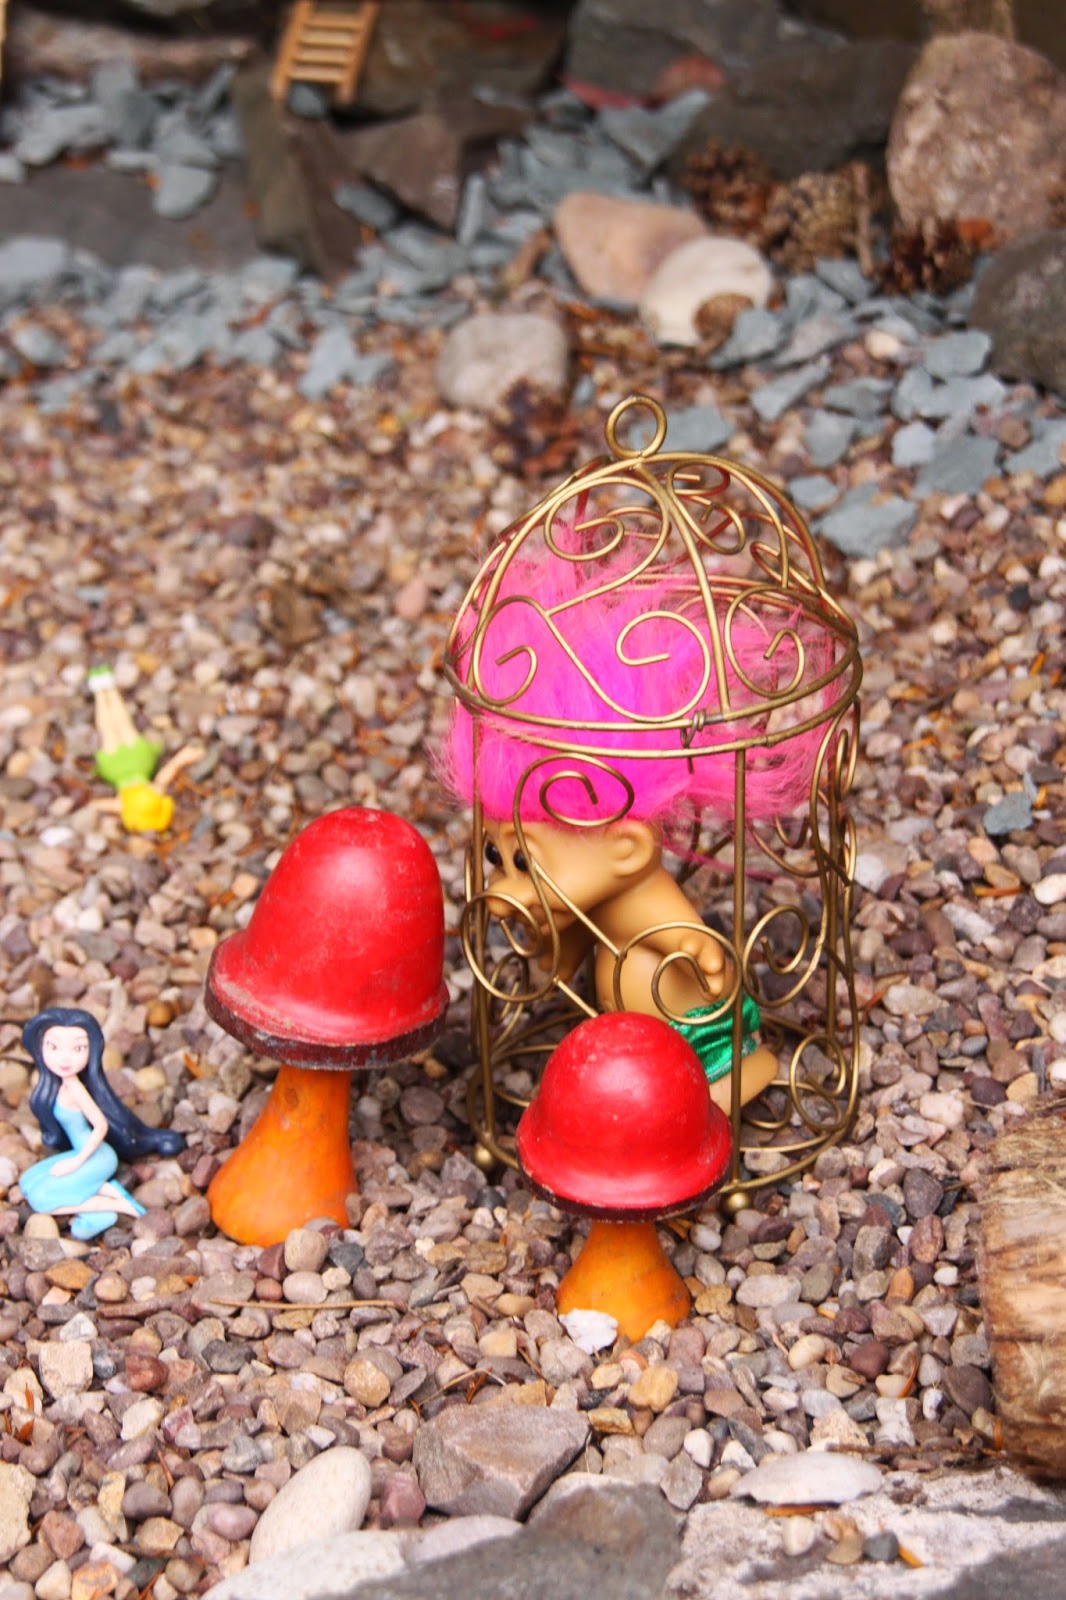
Trolls can be captured in an old tea light holder


A new sign just in case anyone is in any doubt..


And the fairies soon moved in. :-)


At the minute the children love the bits and bobs but they do have a tendency to carry them around the garden and scatter them. I intend to add a couple of large logs, with cushions, for seats in front of the house to see if that anchors them. 

Do you have any more ideas or inspiration to improve my fairy corner?

Sunday 7 September 2014

Painting Space

The painting wall... a place to explore paint and focus on process, not product... i.e. to paint without worrying about producing a picture, but rather to experiment with paint on different surfaces and using different tools just for the sake of it, to mix colours and other materials to see what happens.


I'm lucky to have a friend who is a picture framer by trade and he gave me lots of picture mounts in lots of different sizes and shapes. I put some of these to good use by stapling them onto the shed wall to offer a more interesting and welcoming surface and encourage experimentation.

The paint pots are held in the plastic clips used for holding drain pipes against the wall, which perfectly fit cups for the paint and are easily screwed into the wood of the shed. No more spilled paint.


The children know that they are allowed to paint anything in this area, gravel, leaves,  rocks, even the roof of the shed if they can reach it, but they also know not to paint anywhere else. They have tested these boundaries by moving around the shed to other sides and to other parts of the garden but now they know, they are happy to keep to their side of the bargain.

We don't worry about keeping the colours pure, we even top up colours with other colours and somehow we don't seem to end up with everything a muddy brown. The paint soon dries and the next layers goes on fresh and bright.


If it rains and the paint pots fill with water they use that to get different effects. One little boy even worked out that he could use the paint as glue and stuck leaves on the wall... child led learning at it's best.

I'd love to hear your comments on how else you think I could improve this area or anything else I could offer or just your experiences of similar experiences. :-)


Friday 5 September 2014

Let there be (more) music...part 2

My last post was all about my new musical pipes (sounds like a medical condition- maybe I can get some cream for it!)


I was so pleased with them and with renewed vigour I set about bringing the rest of the area upto scratch.  Firstly the original pots and pans for bashing. They were still in great shape but the pole they where hanging from was hanging by a thread and no longer fit for purpose. Luckily I had a couple more stands and with a bit of laminate flooring, some spray paint (from Wilkos) a hook (Poundland) and a pack of wooden spoons (Poundland) I soon had a new instrument. I drilled some holes along the bottom of the cross plank for easier hanging and I even wrote a few musical words along the top for a literacy rich environment (words like 'pop' 'bang' 'jingle' ... you get the picture)


While I was looking for wood for the above projects I moved along length of corregated piping out of the way.. then inspiration struck... surely this was a new instrument. I threaded it onto a bit of wire and created a hook at the top for hanging, added a handful of gravel for additional sounds and hey presto...


I had intended to spray it in two colours but I liked the black showing through. This is played by either hitting it, shaking it or running a stick over the textured surface.

What I really wanted was a drum set. I had seen some beauties on Pinterest made of big logs constructed to look like real drum kits, but lacking the materials or skills to create one of these I cast around for alternatives..


An old Wii drum set sadly cluttering up my back bedroom. (I had previously tried to give this away but no one wants them anymore) The top two drums unscrew so I was able to change one for foil trays squashed flat. I found an old saucepan lid that fitted perfectly over one of the drums for a different sound and on another I added a flat wicker basket (unfortunately after I took this shot). I'll keep looking for different things to add for variety but this has been a big hit already.

To finish this project I tarted up the little milk shakers that the children made last year by treating them to a coat of spray paint and some insulating tape. We'll be making some more of these soon. And made a new sign by using emulsion paint of a big rock.


The old chimes are still hanging from last year, the original drums of stumps and buckets still work and I just need to find some chime bars from an old xylophone and/or hand bells.


I love the new area and more importantly, so do the children.

If you have any ideas that I can add I'd love to hear them :-)

Let there be music...part 1

Over the summer holidays I had plans to revitalise several areas in our school garden. Actually I have grand plans but given that the school budget has to fund the whole school and not just my areas I have to restrain my inner Alan Titchmarsh designer instincts and find craftier (cheaper) ways to satisfy my creative bent.

This post  is all about the new music area which originally was created with the children and consisted mainly of buckets, little plastic milk bottles and pots and pans. They loved it but the weather and time had done it's stuff and it was looking less like a music area and more like a fly tipping site.


I had been pinning for a while and had a few ideas of things that I wanted to  offer in this area, but the thing I craved the most was some musical pipes. My original vision was of a frame attached to trees with the pipes attached vertically but this plan was scuppered right at the start when I realised that the trees I had available in the area were no way strong enough or suitable. Thankfully I found some short posts with feet attached and then some old laminate flooring planks which were easily attached to make a perfect stand. I bought some drainpipe and the little plastic fixings which were soon attached. I cut the pipe into three different lengths to give me different tones when played.

To pretty it all up I spray painted the tops and added some insulation tape bands. These don't do anything but they do look more eye catching a professional.

I found some old flip flops and removed the bits that hold them onto your feet. They were easily decorated using sharpies. I punched holes in one end and threaded string through. A hook on the stand to hang them from and Bingo, job done.


You'll see from the picture that I also added a couple of long pipes that were lying around the garden.  Ideally I'd have cut curves in the top of the stand to make them more secure but I didn't have the tools to do that and as mine are in gravel they don't move much anyway. And in addition, it means that we can still move the bigger pipes to use for posting cars and balls down.

This instrument is played by bashing the top of the pipes with the flat side of the flip flop and the differing lengths make a range of satisfying notes.

That was stage one of the new music area, tune in to part two to see what I made next.....


Wednesday 25 June 2014

Making Bike Play More Exciting...

I've recently been looking some of my local nurseries and playgroups as I carried out visits to the new children that will be starting in my class in September. I'm always on the look out for inspiration, new takes on old activities, alternative uses for things, extensions for old favourites and boy have I found one.

One Playgroup had the most fantastic ramp which had children swarming over it with all manner of bikes and sit on toys. The ladies there told me thatthe son of a neighbour used to use their area (with permission) for skateboarding and he'd left his ramps and moved onto new hobbies. So they requisitioned them for the children and I was instantly jealous.

As soon as I was able I had a look at our stockpile of potentially useful items and spotted a pile of pallets and several large tyres..... hm.... a little while later....Hey Presto...


The children were fascinated and after a little talk about safety precautions, staying straight, keeping your back wheels away from the edge, being aware of splinters, taking turns etc they can't get enough of it.

Already children are building up the strength to be able to cycle up the ramp, warning each other if they get too close to the edge, helping each other up to the top and taking turns. They are experimenting with different bikes and working out that they need a good long fun up to stand a chance of getting to the top.  Learning at its best. :-)

Wednesday 18 June 2014

Sandy Gloop

We've recently been playing with Soapy Sand (see my previous post) and while the children are loving it I couldn't help but wonder..... what would happen if......I mixed in cornflour?


I started with a few good handfuls of cornflour and then added soapy sand, handful at a time, mixing well each time until I had a consistency I was happy with. The children were fascinated with the process, making comments and poking it with curious fingers.

The resulting gloop behaves almost exactly like cornflour and water but the soapy sand has the advantage of really bulking it all out so that we ended up with a whole trayful of gloop that allowed at least four children to play quite happily at a time without complaints that anyone was hogging it.


It does dry out over time but it's easy to top it up with a bit of water and my children were fascinated by the changes and I was able to feed in lots of vocabulary (solid, aqueous, liquid, runny, hard)

They loved that they could mould it in their hands but that it turned to liquid as soon as they stopped moving it, and then it ran between their fingers and off their hands.


And I found it all quite therapeutic too and my hands are lovely and soft... instant  exfoliating treatment:-)


An old favourite... soapy sand.

Soapy Sand

We've recently had a big tray of sand in our classroom and the children have had the usual fun with it but it must be said that it was losing it's attraction, becoming a little passe. So I cast my mind back to my playgroup days for inspiration and remembered a little activity that used to be mentioned in the foundation stage guidance... Soapy Sand. We used to use it in a shallow builder's tray as a mark making activity as well as a sensory one.


This is really easy to make and only needs two ingredients plus water and the result is a frothy delight!

Ingredients:
Play sand
Washing up liquid (I used Fairy Liquid)
Water.

The method couldn't be simpler,  squirt some washing up liquid over the sand (you don't need huge amounts, especially if you use a good quality washing up liquid like Fairy), begin to mix and agitate, adding a little water and mixing until the sand becomes light and frothy. You can experiment with different amounts of water, the more water you add the lighter the result will be. You can even get the children to mix it for you, it's that easy to make.

Sadly I don't have any photos of me making this, only these of it being played with but it's simple enough to make anyway.

I can't explain how different to normal sand this is, you have to try it to see. My children have had a wonderful time playing with this this week, hope yours do too.